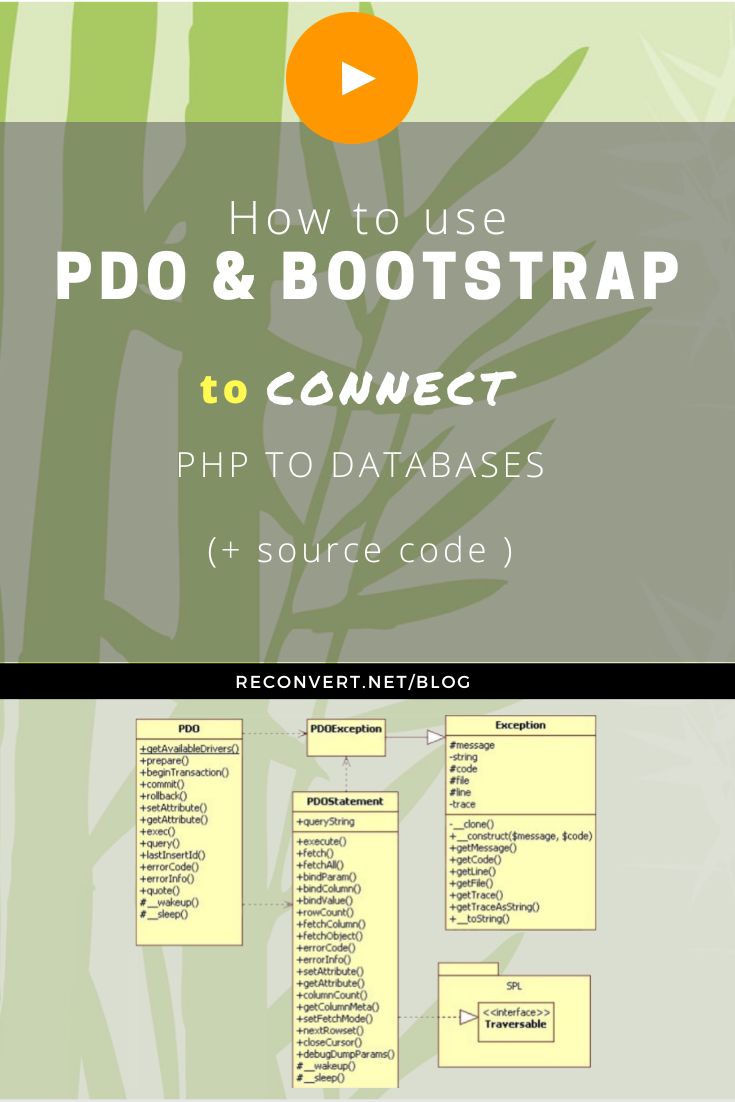
How to use PDO and Bootstrap to connect PHP to databases
If you use the MySQLi API to access your MySQL data, your code is closely tied to this API and will no longer work if your MySQL database migrates to Oracle or SQL Server for example. To make your code independent of a DBMS, you can adopt the PDO component. In the following lines, we see how to use PDO by displaying MySQL data. The display interface will use Twitter Bootstrap.
PDO or PHP Data Objects is a set of classes for PHP interaction with databases. These classes can be used to display or update data, to create and use prepared statements or to manage transactions.
In this introduction to PDO, we will :
- create a HTML5 template with Bootstrap for the display interface,
- create a table books in a database named bookstore,
- create a books.php page to display data,
- use some common PDO methods.
You can go further in the use of PDO by implementing the prepared statements and transaction functionalities, by creating complete CRUD interfaces or by inheriting from the PDO class to add your own behaviors.
Want to go further with PDO?
Attend the PHP virtual classroom.
Firstly, we will present the most common PDO classes and methods for interacting with data.
1- The classes provided by PDO
The PDO component provides 3 main classes for working with data: the PDOException class, the PDO class and the PDOStatement class :
- PDOException : used to manage exceptions. It inherits from Exception.
- PDO : contains methods to query and update data.
- PDOStatement : contains the fetch methods.
Some PDO methods
PDO classes expose several methods and several attributes. Here are some of these methods, which you will find in more detail in the documentation:
query() : executes a SELECT query, returns a PDOStatement object.
exec() : to execute update requests.
lastInsertId() : gives the ID of an insert SQL request.
prepare() : to prepare a prepared statement.
fetch() : perform the fetch.
setFetchMode() : sets the fetch type.
beginTransaction() : start a transaction.
2- Create a table named books
We will manage books stored in a books table in MySQL database. Say your database is called bookstore.
Below is the books table, with 7 fields or columns.
You can create the table by using the SQL code below. If you use a tool like phpMyAdmin, you can create this table through the interface without typing any SQL code.
CREATE TABLE books(
    bookid INT(3) PRIMARY KEY AUTO_INCREMENT,
    title VARCHAR(50),
    author VARCHAR(50),
    editor VARCHAR(50),
    price DECIMAL(5,2),
    description TEXT,
    photo VARCHAR(30)
) ENGINE=InnoDB DEFAULT CHARACTER SET = utf8 COLLATE = utf8_general_ci;
After creating your table, insert some books into it by use the insert SQL code below; add as many books as you want.
INSERT INTO books
VALUES(NULL, 'The good wife', 'John DOE', 'CBS', 15, 'Enjoy the life', 'wife.jpg'),
(NULL, 'Tales of mystery and imagination', 'Edgar Allan POE', 'Enigma', 22, 'Tales', 'tales.jpg');
You don't have enough SQL knowledge ?
Attend the SQL virtual classroom.
3- Bootstrap template to display data
To have a responsive display of our books, we will create a simple Bootstrap template with a few bootstrap rows.
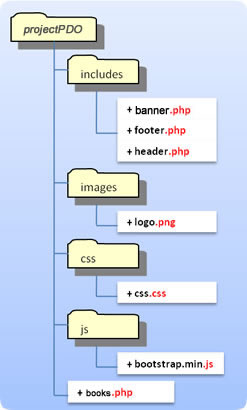
This template will be composed of several parts that you just need to include with the PHP include() directive to quickly compose a new page.
+ header.php will contain the navigation.
+ banner.php will allow you to add a slider.
+ footer.php will end each page.
All these files can be placed in a folder named includes, images files in images folder, styles in css folder and javascripts in js folder (see figure).
Custom CSS and javascript files can be downloaded here: css.css and bootstrap.min.js.
header.php
It contains the HEAD of each page with references to CSS files like bootstrap.min.css and JavaScript files. It also contains the Bootstrap navigation for each page.
<!doctype html>
<html>
	<head>
		<meta charset="utf-8">
		<title><?php echo $pagetitle;?></title>
		<meta name="viewport" content="width=device-width,initial-scale=1.0"/>
		<meta name="description" content="Bookstore"/>

		<link rel="stylesheet"
		      href="https://maxcdn.bootstrapcdn.com/bootstrap/3.3.7/css/bootstrap.min.css"
			  media="screen">

		<link href="css/css.css" rel="stylesheet" media="screen"/>
		<script src="http://code.jquery.com/jquery-2.1.0.min.js"></script>
	</head>

<body>
    <nav class="navbar navbar-default navbar-fixed-top">
		<div class="container-fluid">
			<div class="navbar-header">
			  <button class="navbar-toggle" data-toggle="collapse"
			          data-target=".navHeaderCollapse">
					<span class="icon-bar"></span>
			  </button>
			  <a class="navbar-brand" href="index.php">
				<span class="navbar-logo">
					<img src="images/logo.png" width="50%">
				</span>
			  </a>
			</div>

			<div>
			  <ul class="nav navbar-nav collapse navbar-collapse n
			           avHeaderCollapse navbar-right">
				<li><a class="link" href="index.php">Home</a></li>
				<li><a class="link" href="books.php">Books</a></li>
				<li><a class="link" href="contact.php">Contact</a></li>
			  </ul>
			</div>
		</div>
    </nav>
banner.php
The banner is a location on a Bootstrap row used for placing content such as text or a slider for example.
<div class="bandeau">
	<div class="container">
		<br><br><br>
		<div class="row">
			<div class="col-md-12 col-sm-12">
				<div class="accroche">
					<p><span>
					   BEST BOOKS
					</span></p>

					<p class="sous-accroche">
						<span>
						  IT technologies.
						</span>
					</p>
				</div>
			</div>
		</div>
	</div>
</div>
footer.php
The footer ends each page. It contains for example a bottom menu, a copyright or any other information that you want to put in footer. It may also refer to Javascript code: bootstrap.min.js, Facebook, Twitter, Google Analytics or other tracking code.
	    <footer class="footer">
			<div>
				<div class="copyright">
					Copyright : Bookstore 2022.
				</div>
			</div>
	    </footer>

		<script src="js/bootstrap.min.js"></script>
	</body>
</html>
4- Display data - the books.php page
It is now possible to create the display page using PDO. Its interface can be improved to visualize the details of a book, the deletion of one or more books, the update of a book and to add a book (CRUD).
The books.php page will have code similar to the following.
<?php
	$pagetitle = "Bookstore : list of books";//Page title
	include('includes/header.php');
	include('includes/banner.php');
?>
<div class="container-fluid marges background" style="margin-top:0px;margin-bottom:0px;">
	<div class="container">
		<div class="row">
			<div class="col-md-12 title">
				List of books
			</div>
		</div>

		<div class="row">
			<div class="col-md-12 argu">
				WE WILL DISPLAY HERE
			</div>
		</div>
	</div>
</div>

<?php
	include('includes/footer.php');//Footer
?>
Executing the SQL query with PDO
To execute the query that retrieve books, you must instantiate a PDO object and invoke the query() method on it. To handle error cases, you can use an attribute defining the exception handling mode (line 10) and place all the useful code in a try block. The catch block is used to display a possible error message.
<?php
    // books.php
	try {
		$dsn = 'mysql:host=localhost;dbname=bookstore;charset=utf8';
		$user = 'root'; $pass = '';

		$options = array();// Array of options des options

		//Create a PDO object
		$dbh = new PDO($dsn,$user,$pass,$options);
		$dbh->setAttribute(PDO::ATTR_ERRMODE,PDO::ERRMODE_EXCEPTION);

		// La requete SQL
		$query = "SELECT * FROM books";

		// Query : return a PDOStatement object
		$stmt = $dbh->query($query);

		// Define fetch mode
		$stmt->setFetchMode(PDO::FETCH_OBJ);
	}
	//Return a PDOException object
	catch (PDOException $e) {
		//Apply getMessage() method
		echo $e->getMessage().   "<br/>";
	}

	//Page title
	$titre = "Bookstore : best books.";


	//Header and  and bootstrap navbar
	include("includes/header.php");

	// Banner
	include("includes/banner.php");
?>
$dbh = new PDO($dsn, $user, $pass, $options) : creation of a PDO object. $options is an array of options that we want to define when creating the object.
$dbh->setAttribute(PDO::ATTR_ERRMODE, ERRMODE_EXCEPTION) : we indicate that we will handle errors using the exception mechanism with a PDOException object.
$stmt = $dbh->query($query) : we execute the query with the query() method and we obtain a PDOStatement type object.
$stmt->setFetchMode($PDO::FETCH_OBJ) : we define the fetch mode we want to use.
We display data in the BODY of the page. The fetch() method will be used.
Displaying data within the page
To display the correct information, we can test the number of rows returned by the SELECT query. This test is done with the rowCount() method of the PDOStatement object. The fetch uses the fetch() or fetchAll() method.
We place this PHP code in a bootstrap row, in multiple DIVs using the row, container, and container-fluid CSS classes.
<div class="container-fluid marges background" style="margin-top:0px;margin-bottom:0px;">
	<div class="container">
		<div class="row">
			<div class="col-md-12 title">
				List of books
			</div>
		</div>

		<div class="row">
			<div class="col-md-12 argu">
				<?php
					if($stmt->rowCount() != 0){
						echo "<table id='tab_books'>
								  <tr style='background-color:yellow;font-weight:bold;'>
									   <td>Title</td>
									   <td>Author</td>
									   <td>Editor</td>
								  </tr>";
						// Fetch
						while($data = $stmt->fetch()){
							echo "<tr>
									  <td><a href=detail-pdo.php?bookid=" . $data->bookid . ">". $data->title . "</a></td>
									  <td>". $data->author . "</td>
									  <td>". $data->editor . "</td>
								</tr>";
						}
						echo "</table>";// Close the table tag

						//Total
						echo "<br><b>Total : </b>" . $stmt->rowCount() . "<br>";
					}
					else{
						echo "No book in the database.<br><br>";
					}
				?>
			</div>
		</div>
	</div>
</div>
Close the connection
After displaying data, the connection is closed by destroying the PDO object with unset($dbh) or by assigning it the value NULL.
<?php
	// Footer links
	include("includes/footer.php");

	// Close the connection
	unset($dbh); // or $dbh=NULL
?>
Want to go further with PDO?
Attend the PHP virtual classroom.

Founder of ReCONVERT, web and e-commerce project manager, trainer of +2000 trainees face-to-face and online (LIVE and VOD). Currently, I am developing Digital Learning.
Follow me on social media.
Suivre @reconvertme