How to use Doctrine and PHP to connect to databases
Doctrine has become the reference ORM used in the PHP world. For a good start with this PHP component, I propose in this article an example of displaying data from a MySQL table.
The display interface will use Twitter Bootstrap to quickly have a responsive page.
Doctrine is an ORM or Object Relational Mapping. It is a software component that allows you to transform the data contained in a MySQL table into objects that can be used in your application, and vice versa. This procedure is called mapping.
In this introduction, we will:
- take a quick tour of the Doctrine components.
- install Doctrine under Wamp or under Xampp.
- create a simple entity and map with annotations.
- see how to manipulate an entity with EntityManager and Repository.
- create HTML5 template with Twitter Bootstrap for the display interface.
- display entity data in a PHP page.
You can go further in the use of Doctrine by implementing a complete CRUD and managing a complex mapping.

Firstly, we will present the Doctrine component elements, including the ORM package. Then we will see how to install it and use it to display data from a database table.
1- Doctrine components and ORM package
Under the term doctrine are normally grouped 3 distinct components, even if the ORM package is the best known component:
- The DBAL or DataBase Access Layer: this layer, based on PDO (PHP Data Access) offers a number of features for accessing databases. It is an abstraction layer that allows your code to be decoupled from the database type.
- The ORM package of course: this is the one we are talking about in this text. It uses DBAL and Common packages.
- The Common package: this package contains the code common to the first 2 packages.
In the following, we will install the ORM via Composer, then we will create a simple entity to illustrate the mapping with annotations.
2- Install Doctrine under Wamp or Xampp
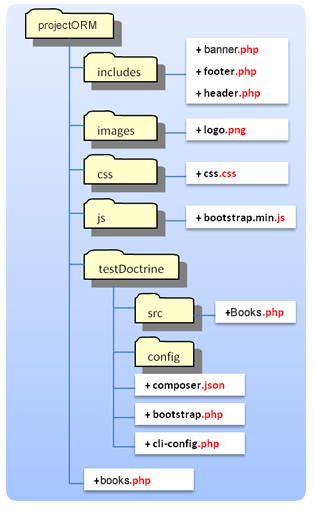
+ I assume you have Wamp or Xampp installed on Windows, or Mamp on Mac, and you have created a project folder named ProjectORM.
+ Then create the 5 sub-folders testDoctrine, images, includes, css and js.
To facilitate the installation of the ORM, we will use Composer. You can download Windows version here: Download Composer.
Install Composer
The installation is quick from the composer.exe file that you have downloaded.
Install Doctrine
+ Start by creating the composer.json file, say in the testDoctrine folder created before. This file tells Composer which commands you are going to execute in the command line. Here, we will install the Doctrine ORM package.
{
	"require": {
		"doctrine/orm": "2.*",
		"symfony/yaml": "2.*"
	},
	"autoload": {
		"psr-0": {"": "src/"}
	}
}
composer.json
+ Then, in the MS DOS command line, go to the testDoctrine folder then run the Composer install command.
+ Create testDoctrine/src and testDoctrine/config folders.
+ Create in phpMyAdmin the testdoctrine database..
That's it: you can now use the ORM.
bootstrap.php file and EntityManager
The entities of your application (users, products, etc.) are managed by an object called EntityManager. It is recommended to create this manager in a separate bootstrap.php file that will be included as soon as you want to manage entities. We place it in the testDoctrine folder.
<?php
	use Doctrine\ORM\Tools\Setup;
	use Doctrine\ORM\EntityManager;

	require_once "vendor/autoload.php";

	// default Doctrine Configuration with Annotations
	$isDevMode = true;
	$config = Setup::createAnnotationMetadataConfiguration(array(__DIR__."/src"), $isDevMode);
	// En yaml ou en  XML
	//$config = Setup::createXMLMetadataConfiguration(array(__DIR__."/config/xml"), $isDevMode);
	//$config = Setup::createYAMLMetadataConfiguration(array(__DIR__."/config/yaml"), $isDevMode);

	// Database parameters
	$conn = array(
		'driver' => 'pdo_mysql',
		'user' => 'root',
		'password' => '',
		'dbname' =>'testdoctrine',
	);

	// get the Entity Manager
	$entityManager = EntityManager::create($conn, $config);
?>
bootstrap.php
+ createAnnotationMetadataConfiguration(.) : this method is used to indicate that we want to use annotations in the classes representing your entities. These entities are placed in the src folder..
+ createXMLMetadataConfiguration(.) : an XML file will be used to specify the mapping.
+ createYAMLMetadataConfiguration(.) : we will use a YAML file to specify the mapping.
+ create(.) : method to create the EntityManager.
Doctrine in Command Line
To launch Doctrine commands on the command line, we will create the cli-config.php file returning a console. We place it in the testDoctrine folder. We use the createHelperSet() method which receives the EntityManager. It is therefore necessary to include the bootstrap.php file which creates the EntityManager.
<?php
    // Include the bootstrap file
	require_once "bootstrap.php";

	return \Doctrine\ORM\Tools\Console\ConsoleRunner::createHelperSet($entityManager);

?>
cli-config.php
3- Create an entity and mapping with annotations
We want to manage Books entities that will have to be persisted in the MySQL database. Your database is testdoctrine as shown in your bootstrap.php file.
For a Books entity, I suggest you manage the following information: bookid, title, author, publisher, price, description and finally photo which will be the cover image of a book.
a/ Create the Books class below with the associated mapping. This class will correspond to a database table whose name can be given with the annotation: @Entity @Table(name="books").
To simplify, the columns are strings except the price which will be decimal and bookid which is an integer (automatically generated: AUTO_INCREMENT therefore in database language).
b/ Add getters and setters and save your class under Books.php in the testDoctrine/src folder.
c/ In the terminal, delete the schema and re-create it by typing these 2 commands:
testDoctrine>vendor\bin\doctrine.bat orm:schema-tool:drop--force
testDoctrine>vendor\bin\doctrine.bat orm:schema-tool:create
The entity is now created in database.
<?php
	/**
	 * @Entity @Table(name="books")
	 **/
	class Books
	{
	  //Attributes
	  /** @Id @Column(type="integer") @GeneratedValue **/
	  private $bookid;

	  /** @Column(type="string", length = 255, unique = true) **/
	  private $title;

	  /** @Column(type="string") **/
	  private $author;

	  /** @Column(type="string") **/
	  private $publisher;

	  /** @Column(type="decimal") **/
	  private $price;

	  /** @Column(type="string") **/
	  private $description;

	  /** @Column(type="string") **/
	  private $photo;


	  // Getters
	  public function getBookid() {return $this->bookid;}
	  public function getTitle(){return $this->title;}
	  public function getAuthor() {return $this->author;}
	  public function getPublisher(){return $this->publisher;}
	  public function getPrice() {return $this->price;}
	  public function getDescription(){return $this->description;}
	  public function getPhoto(){return $this->photo;}


	  //Setters
	  public function setBookid($bookid){
		$bookid = (int) $bookid;

		if ($bookid > 0){$this->bookid = $bookid;}
	  }

	  public function setTitle($title){
		if (is_string($title)){$this->title = $title;}
	  }

	  public function setAuthor($author){
		if (is_string($author)){$this->author = $author;}
	  }

	  public function setPublisher($publisher){
		if (is_string($publisher)){$this->publisher = $publisher;}
	  }

	  public function setPrice($price){
		  $price = (float) $price;
		  $this->price = $price;
	  }

	  public function setDescription($description){
		if (is_string($description)){$this->description = $description;}
	  }

	  public function setPhoto($photo){
		if (is_string($photo)){$this->photo = $photo;}
	  }
	}
?>
Books.php
4- Manipulate entities: EntityManager, Repository
The Entity Manager or EM is the object that allows the manipulation of the entity, for example saving in the database. You created it in the bootstrap.php file.
EntityManager methods(EM)
persist($entite) : persists the entity.
flush() : commit the persists.
clear($nomentite) : cancels all persists performed.
detach($nomentite) : cancels the persist on the entity given in argument.
contains($entite) : true if $entite is managed by EM (if there was a persist on $entite).
refresh($entite) : updates $entite in the state where it is in database.
remove($entite) : delete the entity in the database.
The Entity Repository makes it possible to retrieve the entities from the database, in order to display them for example on a web page.
Entity Repository methods
find($id) : find the entity corresponding to an ID.
findAll() : returns all entities in Array (we therefore can use a foreach loop).
5- Bootstrap template to display data
To have a responsive display of our books, we will create a simple Bootstrap template with a few bootstrap rows.

This template will be composed of several parts that you just need to include with the PHP include() directive to quickly compose a new page.
+ header.php containing the navigation,
+ bandeau.php will allow you to add a slider,
+ footer.php ending each page.
All these files can be placed in a folder named includes, images files in images folder, styles in css folder and javascripts in js folder (see figure).
Custom CSS and javascript files can be downloaded here : css.css and bootstrap.min.js.
header.php
It contains the HEAD of each page with references to CSS files like bootstrap.min.css and JavaScript files. It also contains the Bootstrap navigation for each page.
<!doctype html>
<html>
	<head>
		<meta charset="utf-8">
		<title><?php echo $pagetitle;?></title>
		<meta name="viewport" content="width=device-width,initial-scale=1.0"/>
		<meta name="description" content="Bookstore."/>

		<link rel="stylesheet"
		      href="https://maxcdn.bootstrapcdn.com/bootstrap/3.3.7/css/bootstrap.min.css"
			  media="screen">

		<link href="css/css.css" rel="stylesheet" media="screen"/>
		<script src="http://code.jquery.com/jquery-2.1.0.min.js"></script>
	</head>

<body>
    <nav class="navbar navbar-default navbar-fixed-top">
		<div class="container-fluid">
			<div class="navbar-header">
			  <button class="navbar-toggle" data-toggle="collapse"
			          data-target=".navHeaderCollapse">
					<span class="icon-bar"></span>
			  </button>
			  <a class="navbar-brand" href="index.php">
				<span class="navbar-logo">
					<img src="images/logo.png" width="50%">
				</span>
			  </a>
			</div>

			<div>
			  <ul class="nav navbar-nav collapse navbar-collapse n
			           avHeaderCollapse navbar-right">
				<li><a class="link" href="index.php">Home</a></li>
				<li><a class="link" href="books.php">Books</a></li>
				<li><a class="link" href="contact.php">Contact</a></li>
			  </ul>
			</div>
		</div>
    </nav>
code du header.php
banner.php
The banner is a location on a Bootstrap row used for placing content such as text or a slider for example.
<div class="banner">
	<div class="container">
		<br><br><br>
		<div class="row">
			<div class="col-md-12 col-sm-12">
				<div class="accroche">
					<p><span>
					   BEST BOOKS
					</span></p>

					<p class="sous-accroche">
						<span>
						  IT technologies.
						</span>
					</p>
				</div>
			</div>
		</div>
	</div>
</div>
banner.php
footer.php
The footer ends each page. It contains for example a bottom menu, a copyright or any other information that you want to put in footer. It may also refer to Javascript code: bootstrap.min.js, Facebook, Twitter, Google Analytics or other tracking code.
	    <footer class="footer">
			<div>
				<div class="copyright">
					Copyright : Bookstore 2022.
				</div>
			</div>
	    </footer>

		<script src="js/bootstrap.min.js"></script>
	</body>
</html>
code du footer.php
6- Display data - the books.php page
It is now possible to create the display page using Doctrine. Its interface can be improved to visualize the details of a book, the deletion of one or more books, the update of a book and to add a book (CRUD).
The books.php page will have code similar to the following.
<?php
    // books.php
	$titre = "Bookstore : list of books";
	include('includes/header.php');
	include('includes/banner.php');
?>
<div class="container-fluid marges background" style="margin-top:0px;margin-bottom:0px;">
	<div class="container">
		<div class="row">
			<div class="col-md-12 title">
				List of books
			</div>
		</div>

		<div class="row">
			<div class="col-md-12 argu">
				DISPLAY HERE
			</div>
		</div>
	</div>
</div>

<?php
	include('includes/footer.php');//Footer
?>
Create and use a Repository
To retrieve the books to display, you need to create a Repository from the EntityManager. This is done with the getRepository() method of the EntityMananger. All entities are retrieved with the findAll() method of the Repository.
<?php
    // books.php
	// Require
	require_once "testDoctrine/bootstrap.php";

	// Get Repository object
	$bookRepository = $entityManager->getRepository('Books');

	// Get books with findAll(.)
	$books = $bookRepository->findAll();

	//Page title
	$titre = "Bookstore : best books.";

	//header
	include("includes/header.php");

	// Banner
	include("includes/banner.php");
?>
$livreRepository = $entityManager->getRepository('Livres') : create a Repository object with the getRepository method of the EntityManager.
$livres = $livreRepository->findAll() : get the data to display.
Displaying the data in the body of the page will just consist of extracting the books from the $books object, using a foreach loop, as in the code below.
Display data within the page
To display the correct information, we can test the number of rows returned with the count() function.
We place this PHP code in a bootstrap row, in multiple DIVs using the row, container, and container-fluid CSS classes.
	<div class="container-fluid marges background">
		<div class="container">
			<div class="row">
				<div class="col-md-12 title">
					List of books, with Doctrine
				</div>
			</div>

			<div class="row">
				<div class="col-md-12 argu">
					<?php
						if(count($books) != 0){
							echo "<table id='tab_books'>
									  <tr style='background-color:yellow;font-weight:bold;'>
										   <td>Title</td>
										   <td>Author</td>
										   <td>Publisher</td>
									  </tr>";

							//loop
							foreach($livres as $data){
								echo "<tr>
										  <td><a href=detail.php?livreid=" . $data->getBookid() . ">". $data->getTitle() . "</a></td>
										  <td>". $data->getAuthor() . "</td>
										  <td>". $data->getPublisher() . "</td>
									</tr>";
							}

							// Close HTML table
							echo "</table>";

							//Total
							echo "<br><b>Total : </b>" . count($books) . "<br>";
						}
						else{
							echo "No book in database.<br><br>";
						}
					?>
				</div>
			</div>
		</div>
	</div>


<?php
	//footer
	include("includes/footer.php");
?>

Founder of ReCONVERT, web and e-commerce project manager, trainer of +2000 trainees face-to-face and online (LIVE and VOD). Currently, I am developing Digital Learning.
Follow me on social media.
Suivre @reconvertme


